Be sure to check out my Scripting4Crypto initiative. It’s a fun way to get into using cryptocurrencies all while getting your PowerShell needs met.
In this post, I’m going to demonstrate how to create and use custom picklists within ProjectWise using PowerShell. These custom picklists can be used to limit the values available for document attributes.
The PowerShell cmdlets we will look at are Add-PWPicklist, Get-PWPicklist, and Get-PWPicklistItems. There are a few other cmdlets for working with custom picklists.
# The following will list all cmdlets pertaining to the Custom Picklists.
Get-Help *-pwpicklist
# The following will show all of the help information for the Add-PWPicklist cmdlet.
Get-Help Add-PWPicklist -Full
The Add-PWPicklist requires two parameter values, a picklist name, and the corresponding picklist values.
In the following example, I create an array variable containing the name of 3 states. I use the values in the array as the picklist values and “States” for the picklist name.
# Array of State names
$States = "New York", "Colorado", "South Carolina"
# Create a new ProjectWise picklist.
Add-PWPicklist -PicklistName "States" -PicklistValues $States
After running, a new database table has been created within the current ProjectWise datasource with the Table name CustomPicklists. The table contains two columns, PicklistName and PicklistValue.
If we run a simple query within our database now, we should see the new table, and the columns and data.

Next, I am going to create 3 new arrays with cities corresponding to each of the states added. Then create 3 new picklist for each state using the corresponding array of cities as the values.
# The following are 3 arrays with cities that correspond to the states in the states array.
$NYCities = "New York", "Albany", "Saratoga", "Buffalo", "Rochester", "Syracuse"
$ColoradoCities = "Denver", "Boulder", "Golden", "Durango", "Colorado Springs"
$SCCities = "Greenville", "Spartanburg", "Charleston", "Columbia", "Myrtle Beach"

# Creating 3 new picklists for each state and corresponding cities.
Add-PWPicklist -PicklistName "New York" -PicklistValues $NYCities
Add-PWPicklist -PicklistName "Colorado" -PicklistValues $ColoradoCities
Add-PWPicklist -PicklistName "South Carolina" -PicklistValues $SCCities
Again, if you look in the database, you will see the new picklists and corresponding values. In the following you will see that I am only querying for the cities within Colorado.

To get a list of Custom Picklists or Values within the current datasource using PowerShell, use the following cmdlets.
# Will return a list of all available picklists. Or false if none exists.
Get-PWPicklist
# Will return the values corresponding to the provided PicklistName.
Get-PWPicklistItems -PicklistName States
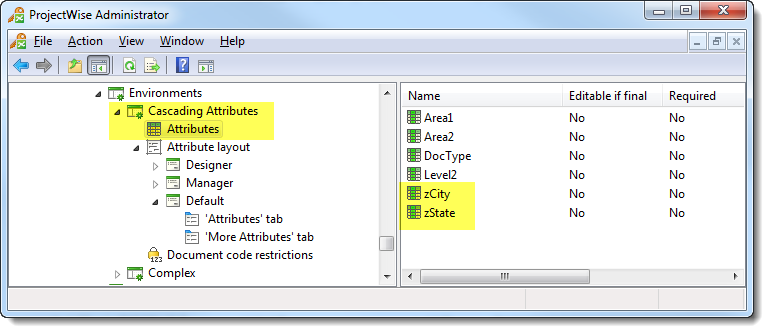
Now that we have the new Custom Picklists created in our datasource, we can add them to document attribute definitions. In the following you will see that I have added two new attributes to my environment.
For the zState attribute, we want to limit the available values to only the states within our custom picklist States. To accomplish this, we add the following SQL Select statement to the Value list section on the Value tab of the attribute properties dialog. Toggle on Limit to list to ONLY allow these values.
SELECT PicklistValue FROM CustomPicklists WHERE PicklistName LIKE ‘States’

For the zCity attribute, we want to limit the values here to correspond to the selection within the zState attribute. For example, if we select Colorado in the zState attribute, we will only see the cities within Colorado within the zCity attribute. Again, we add the following SQL Select statement to the Value list section and toggle on Limit to list. The $EDIT#zState$ is replaced in the query with the zState attribute value. If nothing, is selected, no cities will be returned.
SELECT PicklistValue FROM CustomPicklists WHERE PicklistName LIKE ‘$EDIT#zState$’

The two attributes were added to the Default interface.

Within ProjectWise Explorer, I created a new folder and applied the Cascading Attributes environment to it.

Now when a new document is created, we can select the state.
Only the 3 states entered within our Picklist display.

And then the corresponding city.
Notice, that only those cities within Colorado are available.


Brian, any chance of supporting PickList descriptions along with Picklist values, as does the built in PickList editor?
I can make it work like this:
1) Create your picklist values using the semicolon character as your delimiter (as does PW), so my states look like this:
$States = “NY;New York”, “CO;Colorado”, “SC;South Carolina”, “OH;Ohio”
NOTE that using this approach REQUIRES the use of the semicolon in each value.
2) Create the custom PickList:
Add-PWPicklist -PicklistName “States” -PicklistValues $States
3) Use the following for the SELECT statement for the picklist in the PWAdmin:
SELECT
SUBSTRING(PickListValue,1,CHARINDEX(‘;’,PickListValue)-1) as “Value”,
SUBSTRING(PickListValue,CHARINDEX(‘;’,PickListValue)+1,99) as “Description”
FROM CustomPicklists WHERE PicklistName = ‘States’ ORDER BY 1
NOTE you don’t need to use the ‘as “Value”‘ or the ‘as “Description”‘ – I added them just to make it obvious what the intent is.
LikeLike
If the need is there, I will certainly look into adding descriptions. However, your solution seems to work.
LikeLike
Hi Brian, this would also be very useful to us – with the imminent move to the cloud of our ProjectWise datasources, having a way to manage the picklists from PowerShell is essential but the Description is critical for us. Dan’s workaround is an option but it’d be much better for us to have description as a separate column which isn’t part of the primary key.
I could probably figure out how to use the C API to do it myself, but it seems like it’d be a fairly minor update to the powershell cmdlet rather than me fighting with C..!
Consider this to be an expression of need! Thank you!
LikeLike
I will look into adding a description column.
LikeLike